Pages

Showing posts with label craft. Show all posts

Friday, June 28, 2013

Summer Fun: Recycling Bug


A while back in school my son's class was asked to make litter bugs. They had to use items around the house that could be recycled. I save random stuff all the time because I love to be crafty and I can always find uses for most things I save. My husband however would say differently. 

This project was so much fun putting things together and making something so cute and fun. 

This project was made using a water bottle, milk tops, kleenex box, dixie cup, magazine pages, hot glue and googly eyes. 

We cut the the bottle in half and used a page of a magazine to stuff the top. Then I hot glued the dixie cup to the top of the bottle on the inside. I then glued the bottle of them bottle back other the dixie cup. 

The kleenex box was used to make the wings. The feet are made from several milk tops and the face too. I took a red milk top and cut out a smile for the bugs mouth. 

There are so many great items you can use to create a bug. Dig through the trash can and recycling bin and get your crafty ideas going. It's so much fun to see what can be created with trash. 


Thursday, June 7, 2012

Summer Activities: I Spy Book


My son Mr. I loves I Spy books and I couldn't wait to come up with some way to keep him entertained with a cool book. I was so excited to come up with a way to make our own. 

I hope you have fun making one for your child. 

Supplies:

Card Stock 8x11

Magazines

Glue

Laminating sheets

Scissors

Hole punch

Ball keychain

Computer and printer (optional)

Directions:

Take the cardstock and measure out four squares. You will need 7 squares. 

Take one square and make a cover. Come up with a title and use your computer to print it out or use your own handwriting. I used letter stickers and stars. 

Next think of a theme you would like each page to be. Cut out objects from magazines to complete a theme. You will need 6 themes.

Now organize all your clippings into categories.

Take a square and start organizing the pictures in a collage pattern. Once you get an idea of how you want it you can start gluing.

Glue all the pictures on your cardstock. 


Once you get all your squares covered it’s time to make a list of things you want to spy. Depending on the age of your child you may only want to do 3 to 5 things. 

Type the list on the computer like this:

I Spy

A Butterfly
Three Paw Prints
Five Animals with Fur
Five Insects and
Four things that Fly

Print out the lists. (Check your list 2-3 times before you print it out.)

Cut out the lists and glue them to the backside of the picture. 


Next laminate the pages so that the book can last a long time.

Punch holes in the top corner and put the keychain through them to keep it together. 


You now have a cool “I Spy" book. Take it along in the car for long drives and bring along a dry erase marker to circle the objects when you find them. 


Thursday, May 24, 2012

Crafts: Sun Prints

 
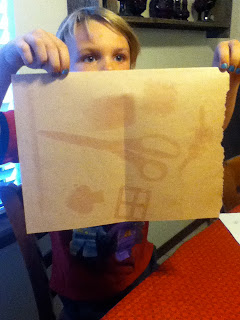
Last summer I had my nephews over at my house and had them make sun prints. They really had fun making them and while we waited we had Popsicles. 

It was a great summer activity.

Here's my post on MetroFamily Magazine to find out how to make your own prints. 

Note: If you use scissors please supervise the children.

Here's our day of fun. 


Popsicle Time


Our Finished Prints


Tuesday, May 22, 2012

10 Steps to Finger Weaving

I remember doing this when I was in grade school. My friends and I would set on the steps in front of the school and make a ton of bracelets and necklaces. One year my mom made me make some for our Christmas tree. It took forever to make it long enough but I did it and it made a nice addition to the tree.

Over the years I’ve made these with my nieces and taught them how to do it too.

Step 1
Wrap around your thumb about 3 times. Take the yarn and weave it in and out of each finger. Start behind your index finger and go back and forth. 


Step 2
Now take your yarn and go around back and wrap it around the front. Lay the yarn just above your bottom yarn. 


Step 3
Take the yarn from your middle finger and pick it up and go over the yarn above and put it over your finger. Do the same with your picky finger.  You should now have all four fingers wrapped. 


Step 4
Now take your yarn and go around back and to the front and over all four fingers. (like shown)


Step 5
Take the yarn from your index finger and pick it up and go over the yarn above and put over your finger. Continue until all fingers are done. (your fingers should look like what is shown)


Step 6
Continue Step 5 about 3 more times. Take yarn off thumb and pull the string to see the length. Continue step 5 until desired link. 


Step 7
When you reach your desired link stop. Take the yarn you are using to wrap around your fingers and this time take the very end of the yarn and put it through the bottom of your wrapped index finger. (like shown)


Step 8
Take the wrap off your finger and continue with the rest of your fingers. You should have nothing on your fingers when you’re finished. 


Step 9
Pull the string to make the end tight. Take other end and pull it too.  


Step 10
Take the ends and tie it together to make a bracelet, necklace or whatever you like. 

 Note: In case your wondering what happened to my hand, I fell on the floor furnace when I was about 1.  

Do you finger weave? What have you made with your finger weaves?

Thursday, May 17, 2012

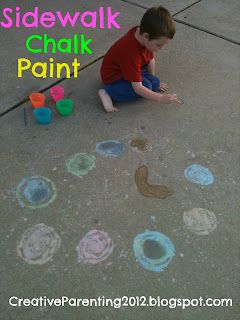
Sidewalk Chalk Paint


Summer time is the best time to get out and play with chalk but what are you going to do with all those little pieces of chalk that end up in the bottom of the bucket? Don't throw them out instead turn them into something even more fun for the kids.


Sidewalk Chalk Paint

Click here for directions.

Most of the recipes I've seen tell you use cornstarch and other things but with this recipe all you need is chalk and water. 

What else can you do with your sidewalk paint? Paint pin cones or make a picture on paper.


Note: This is from my MetroFamily Magazine Craft Blog.