Pages

Showing posts with label kids craft. Show all posts

Friday, June 28, 2013

Summer Fun: Recycling Bug


A while back in school my son's class was asked to make litter bugs. They had to use items around the house that could be recycled. I save random stuff all the time because I love to be crafty and I can always find uses for most things I save. My husband however would say differently. 

This project was so much fun putting things together and making something so cute and fun. 

This project was made using a water bottle, milk tops, kleenex box, dixie cup, magazine pages, hot glue and googly eyes. 

We cut the the bottle in half and used a page of a magazine to stuff the top. Then I hot glued the dixie cup to the top of the bottle on the inside. I then glued the bottle of them bottle back other the dixie cup. 

The kleenex box was used to make the wings. The feet are made from several milk tops and the face too. I took a red milk top and cut out a smile for the bugs mouth. 

There are so many great items you can use to create a bug. Dig through the trash can and recycling bin and get your crafty ideas going. It's so much fun to see what can be created with trash. 


Saturday, June 2, 2012

Summer Activities: Pet Rocks


Rocks are neat. They come in many shape and sizes. The texture is different on each one. They make great pets and gifts.

Here's what you need to make your new friend. 

Supplies:

Rocks

Google Eyes

Glue (hot glue optional)

Paint, markers or crayons

Directions:

Give the rocks a good bath. Lay them outside to dry.

When the rocks are dry decorate them using paint, markers or crayons.

Let them dry. 

Glue on the eyes, if you are using them.

Put your friend in a special place. Pet rocks have fun playing in the garden, on your dresser or on top of your desk. You could make many rocks and give them to friends and family. Make your Dad or Mom one for their desk. A great paper weight. 

Thursday, May 31, 2012

Summer Activities: Binoculars


My son loves to explore. He looks for bugs, rocks, shells and pincones.  He also loves to look at the moon and stars. I decided since he loves to explore it was time to make some binoculars. It seemed like a fun way to make exploring even more exciting. 

Make your own pair of binoculars and start exploring.  Here's what you need. 

Supplies:

2 toilet paper rolls or paper towel roll cut in half

Paints, markers or crayons

Glue

Yarn

Hole punch

Stickers (optional)

Instructions:

Take the rolls and decide how you want to decorate them. You can use paints, crayons or markers.

After the rolls are decorated glue them together side by side.

Next take a hole punch and punch one hole on both sides.

Measure the yarn around your neck making sure you have enough to make the binoculars hang like a necklace.

Use the yarn to string through the holes and tie a knot at the end to secure it. 


Tuesday, May 22, 2012

10 Steps to Finger Weaving

I remember doing this when I was in grade school. My friends and I would set on the steps in front of the school and make a ton of bracelets and necklaces. One year my mom made me make some for our Christmas tree. It took forever to make it long enough but I did it and it made a nice addition to the tree.

Over the years I’ve made these with my nieces and taught them how to do it too.

Step 1
Wrap around your thumb about 3 times. Take the yarn and weave it in and out of each finger. Start behind your index finger and go back and forth. 


Step 2
Now take your yarn and go around back and wrap it around the front. Lay the yarn just above your bottom yarn. 


Step 3
Take the yarn from your middle finger and pick it up and go over the yarn above and put it over your finger. Do the same with your picky finger.  You should now have all four fingers wrapped. 


Step 4
Now take your yarn and go around back and to the front and over all four fingers. (like shown)


Step 5
Take the yarn from your index finger and pick it up and go over the yarn above and put over your finger. Continue until all fingers are done. (your fingers should look like what is shown)


Step 6
Continue Step 5 about 3 more times. Take yarn off thumb and pull the string to see the length. Continue step 5 until desired link. 


Step 7
When you reach your desired link stop. Take the yarn you are using to wrap around your fingers and this time take the very end of the yarn and put it through the bottom of your wrapped index finger. (like shown)


Step 8
Take the wrap off your finger and continue with the rest of your fingers. You should have nothing on your fingers when you’re finished. 


Step 9
Pull the string to make the end tight. Take other end and pull it too.  


Step 10
Take the ends and tie it together to make a bracelet, necklace or whatever you like. 

 Note: In case your wondering what happened to my hand, I fell on the floor furnace when I was about 1.  

Do you finger weave? What have you made with your finger weaves?

Thursday, May 17, 2012

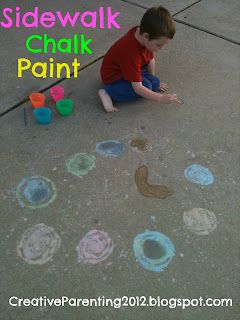
Sidewalk Chalk Paint


Summer time is the best time to get out and play with chalk but what are you going to do with all those little pieces of chalk that end up in the bottom of the bucket? Don't throw them out instead turn them into something even more fun for the kids.


Sidewalk Chalk Paint

Click here for directions.

Most of the recipes I've seen tell you use cornstarch and other things but with this recipe all you need is chalk and water. 

What else can you do with your sidewalk paint? Paint pin cones or make a picture on paper.


Note: This is from my MetroFamily Magazine Craft Blog.

Wednesday, May 2, 2012

Craft: Making your Own Constellations


This is one project that is sure to please any little person who loves to look at the stars and loves space.

Making constellations can be super fun. All you need is a push pin and paper and your on your way.

Here is my post on MetroFamily Magazine with all the instructions.

My son had so much fun making his. He did the one on the very top of this post.


Friday, April 27, 2012

Craft: Bird Nest Supplies

 
This craft is for the birds. This will supply them with things they need to make a nest. A craft that even the little ones can do.

Supplies:

Onion or orange bag

Scrapes of paper

Scrapes of fabric

Grass

Flowers

Little Sticks

Yarn

String 
  
Directions:

Put together a bag full of the different supplies and mix it up. Tie the bag shut and hang from a tree. The birds will come and take what they need to make a bird nest. 


  Happy National Bird Day!

Monday, April 23, 2012

Crafts: Sun Catcher and Book Holder


Spring is a wonderful time to see butterflies and flowers. Here's a colorful sun catcher craft to hang in your window for special treat.

Sun Catcher 


Just because Earth Day is over doesn't mean you still can't recycle something around the house. Make a book holder from a cereal box.

Book Holder

Thank you to MetroFamily Magazine for allowing me to share crafts each week. For more crafts visit MetroFamily Magazine.

Friday, March 30, 2012

Crafts: Spring Flower and Little People

I forgot to post last week's craft from MetroFamily Magazine. This is one is in celebration of Spring. I love seeing the flowers popping up their little heads. It always makes me happy.


Click here for instructions on how to make a coffee filter flower.

This week's craft is pretty neat. I had a lot of fun making this with my 5 year old son. Each one represents someone in the family. We need to make two more for the brothers.


Click here to make a toilet paper roll person.

Monday, March 26, 2012

Planting Seeds with Kids


The spring brings new life of flowers, plants, herbs, baby birds and growth. It’s amazing to see the new growth after a winter. The plants and sun bring a burst of new life and new beginnings. 

This is the time of year to bring out the seeds and plants and start your own beginnings. Hopefully you can start your own garden for fresh food.

Me and my son took yogurt cups, dirt pellets and a couple of veggie seeds and started our first plants for the garden that we hope to get up and running. We picked green beans to grow because they seem to grow fast and they are easy. After a week they are starting to sprout.

It’s fun to grow your own plants whether is be flowers or vegetables. Take some time with your children to start growing your own seeds. It’s neat to watch them develop. It’s something you can say you started and made by yourself.

Here’s what you need.
Pot
Seeds
Potting Soil or dirt pellets
Water
Sunny spot

Take your potting soil and fill your pot up with it. 


Next take the seeds and plant them according to the directions on the package. Write the name of the seeds on the pot or make a marker. 


Add water to the pot and sit in a sunny spot and watch them grow. Make sure you look at them daily and water as needed. 

Our green beans after a week. 


Friday, February 24, 2012

Craft: Leap Frog


Leap into the March with this fun craft I shared on MetroFamily Magazine.

Click here Leap Frog.

Friday, January 27, 2012

Celebrate National Puzzle Day


Sunday is National Puzzle Day. Here's a fun way to make your very own puzzle. 

Supplies:
4X6 photo
Cardstock
Double sided tape
Scissors
Ruler

Directions:
1. Take your photo and put double sided tape on the backside. Affix it to the cardstock. Cut around the picture leaving about a ½ inch border.

2. Next turn your picture over and take the ruler and map out how you would like to cut the pieces. You can do a square or like real puzzle pieces? Take the scissors and cut your pieces.

Put it together with your child and talk about how God put us together. He made us special and different from anyone else.